Pages

Search This Blog

Showing posts with label Blogger Tips. Show all posts

Website Auto Traffic Generator 2.3 Free & Full Cracked with Keygen

Projects:

Set up separate projects for each website you wish to monitor. With one click you can then bring up this data for analysis.

How do you rank?

Find out where your site appears in the search engine results for every word in your keyword list. Traffic Travis hunts through Google & Bing to show you exactly where you stand. 

Add About Me Gadget with Follow Button in Blogger

Linking your personal Google+ profile to your blog will automatically change the old Blogger Profile widget on your blog to the new About Me widget with a follow button. If your blog has more than one author, the widget will appear as the "Blogger contributors widget" instead of the "About Me" widget. The widget appears by default on Blogger mobile templates.


Having the widget on your blog makes it easier for others to access your profile and follow you on Google+ by clicking on the profile widget and the "View my complete profile" link. This may increase your blog’s discoverability and make it easier to form communities with other bloggers and readers.


How To Add About Me Widget With Follow Button


To display your profile gadget on your blog with a Google+ follow button:

==> Log in to Blogger dashboard
==> Go to the Google+ tab to link your blog to your G+ profile
==> Once linked successfully, go to Layout and click "Add a Gadget"
==> Scroll down and select "Profile"
==> Enter your desired title eg "Author" and SAVE.

If you tick the "show on this blog", a small small description about yourself, pulled from your Google+ profile will be shown in the gadget as seen below. If the "introduction" part of your Google+ "About" page is blank, no description will be displayed.

If you leave the "show on this blog" unticked, the description and your name will not be displayed..

If you have a team blog (with more than one author), your Blogger Profile gadget will automatically turn into a contributors-list gadget. In this case, you will have to remove the widget and replace it with HTML gadget containing the code of your personal Google+ badge.

The Google+ profile badge will not appear automatically on the mobile view of your blog like the default Blogger Profile widget. You must enable it in your Blogger mobile template if you want it to display on the mobile view.

Nevertheless, you can display the bio of your blog contributors directly under your blog posts if you enable the "Show Author profile below Posts" via the "Blog Posts" options.

That's all.

Hope it works for you.

www.everytips.tk

Are you Still Using .blogspot? Check why it is Risky

If you've set up a custom domain for your Blogger blog and Blogger deletes your blog, you can move your blog to WordPress and your readers will still find you whether you backed up your posts or not. If you have an up-to-date back up of your Blogger posts, your readers will be able to access all your posts after you move on to WordPress.

If you don't have a back up of your Blogger posts, that means you will have to start publishing new posts after moving to WordPress but your readers will still be able to find you.


This is not the case if you don't have a custom domain and Blogger deletes your blog.

If you are using .blogspot address and Blogger deletes your blog, you will have to use a new web address if you decide to move to WordPress. You cannot use .blogspot address on WordPress and Blogger will not even allow you to set up a new Blogger blog with the .blogspot address of the deleted blog.

This means your blog readers will not be able to find you as they will keep seeing "Blog Not Found" anytime they visit your blog till Blogger re-instates the blog. What if Blogger decides not to restore your blog?

So, if you are still using .blogspot.com address, is it not wise for you to to change to .com today?

You can read how to set up a Blogger custom domain or you can pay me to get it done for you within 24 hours (You will get free custom email).

Remember to always back up your Blogger blog.

www.everytips.tk

Disable Right Click on Blogger Manually by this Code

Preventing text selection on your blog is one of the more popular ways to fight plagiarism as it prevents anyone from copying texts easily from your blog. While it is effective to some extent, in preventing content theft, it also frustrates honest readers by denying them access to useful functions associated with the right click menu, such as Back, Reload, Save as.., Print etc


There are different ways you can disable right-click on your blog. The popluar methods include source padding, css encoding, javascript encryption and trapping the mouse right click.

In this post, I am sharing with you, a simple code you can use to disable text selection on your blog and it works perfectly on Blogger blogs. If you implement it, your blog readers will not be able to select any text, hence they will not be able to right-click. Although, they will be able to right-click on links and images.I like this trick because anyone trying to copy will not even see any pop up telling him or her that the right click has been disabled.


If you run an entertainment blog, you can implement this on your blog but if you run a tutorial blog, I don't think this will be a good idea unless you will ensure that your readers will still be able to copy some codes you might have shared in some of your blog posts.

Below is the simple code you need to disable right click.

<style type='text/css'>
.post-body {
-webkit-user-select: none; /* Chrome all / Safari all */
-moz-user-select: none; /* Firefox all */
-ms-user-select: none; /* IE 10+ */
-o-user-select: none;
user-select: none;
}
</style>


If you don't want to disable right click on all your blog posts, you can just disable it in a single post by copying and pasting the code at the end of your post in the HTML view of your Blogger Post editor. (Not compose mode).

If you want to disable right click on all the posts of your Blogspot blog, go to Template > Edit HTML nd use CTRL F to find : </b:skin>

Directly below it, copy and paste the code.

Try it and let me hear from you if it works for you or not. If you know other methods, kindly share via comments.

Mind you, the smart ones will still be able to bypass it but this is still better than doing nothing. To prevent theft of your post images, I recommend you add watermark to the images to prevent reuse.

www.everytips.tk

how to add you might also like this widget to your blog

1. Open linkwithin.com.
2. Fill the form with required information and then click on get widget.
3. After that copy the code or add direct it to page element.
5. By follow these steps you can add this gadget to your blog.
enjoy :)
www.everytips.tk

How to share video from youtube to facebook, Orkut, Twitter

Follow the following steps to share video from youtube to social website and blogs:
1. Open www.youtube.com 
2. Open your desire video
3. Then click on Share Button
4. Click on website you want to share video.
5. Then sign in to your website account and click on share to share video
enjoy>>>
www.everytips.tk

HOW DO I GET TRAFFIC TO MY WEBSITE OR BLOG?

Submit your site to as many search engines as you can. Here are some of the popular ones you can start with:

AlexaAltaVistaAllTheWebAOLAsk
DMOZExactSeekExciteGigaBlastGoogle
What-U-SeekKanoodleLiveLycosLookSmart
MSNNational DirectoryYahooBingWebCrawler

  1. Use a favicon.ico - see below.
  2. If you have a Christian Website, be sure to submit it to all the Christian Directories. We have a list of about 50 of the most popular Christian Directories here. (sadly the list gets shorter by the month)
  3. Have Dynamic content on your site - Message Board, Links Directory, Guest Book, Online Search, Picture Gallery, Quote of the day, News items, Site Search, Links Engine ... It all makes for a more enjoyable experience for your visitors ... and interested visitors come back.
  4. Make sure you don't have broken links on your site! There is nothing more annoying when one clicks a link and it does not work. There are hundreds of places you can go on the internet that will check your link validity. Use them.
  5. Make sure your META TAGS are done right. Learn how to do this here.
  6. Submit your site to as many privately run Link Directories/Search Engines as you can find. These will not generally boost your traffic in any major way but will help to maintain steady stream of qualified visitors.
  7. Use Banners with care. See below.
  8. Subscribe to the Usenet groups and advertise there. A good place to start is Google Groups
    • Be sure to submit your site in appropriate groups!
    • Be sure to signup with a backup email or you will get onto every spammers database!
    • Be sure you don't SPAM -- only submit a write up of your site once to any given group.
  9. Use social networking sites like TwitterfacebookYouTubePlaxoLinkedin and others to get the word out.

www.everytips.tk

Sitemap Generator for Blogger


For Google

Submit these Sitemaps to Google Webmaster Tools manually
  • atom.xml?redirect=false&start-index=1&max-results=500

For Bing

Just click all the following links to ping Bing

For Yahoo

Just click each of the following URLs to ping Yahoo!Related tutorials:

www.everytips.tk

How to add floating Update and marque to your blog or web


Adding simple scrolling text:
Here is the code to add a simple scrolling text from right to left side


The output will be like:
Example 1:
code to simple scrolling text

If you want some more attraction,then try these,

Add a background color to the text,

Example 2:
code to simple scrolling text
You can choose your background colour by replacing the hexadecimal code(#99ccff).
Here are some mode attributes to learn:


direction="left"

direction="right"

direction="up"

direction="down"


The above attributes tells the text which direction to scroll.
Use the code below:


Here is are some examples:
To scroll in the 'right' direction:
Example 3:

code to simple scrolling text
www.everytips.tk

Tips for Clicking or adsense users

1.dont ask more imps in one person.

2. if u work in 8 persons in a day. ask 4 persons to clik 1 ad, and 3 persons to clik 2 ads, and 1 only imp.

3.1 ad + 4 bps + 11 posts + 1 ad + 3 bps + 5 posts

4. 6 posts + 1 ad + 3 bps + 5 posts + 1 ad + 4 bps + 4 posts

5. 7 posts imps + 1 ad + 5 bps + 5 posts

change this order for ur choice, dont do same order.

6. dont ask more than 18 imps in same ip.

7.before and after work ask to delete cookies. u too do this.

8.Dont chek ur adsense a/c daily. chek 10 days once. or after 10 days.

9. dont do more than 8 ads in a day. for first 2 checks,

10.dont open ur site daily, and while working with others site.

11. make separate user account in ur computer for checking.
www.everytips.tk

Bing webmaster tools trick

Note: The features I discuss here are based on the Silverlight version of the Bing Webmaster Tools. While there is a basic, down level version of the tools available, the Silverlight version offers greatly enhanced functionality and is the recommended way to get the full effect of the tool's rich index data offerings and advanced features for your website.
Site registration
Bing Webmaster Tools allows you to register sites based on the specific site branch you manage.. If you own the site's domain, then register the site at the root. But if you work for a very large website and manage only a subsection of the site, you can register just that subdomain or subdirectory. This feature enables enterprise site managers to delegate site management responsibilities through the tools to specific people or teams, ensuring that any changes made in crawler settings only affect the portion of the site they manage. To make this work, just place the Bing-provided ownership verification code at the registered location (the registered root) and you'll be good to go!
A great benefit of registering a site with Bing Webmaster Tools is that we guarantee the default page of any site you register will be added to the index and will always remain in the index. That alone is reason enough for many smaller sites to sign up!
Note: For sites that are newly registered with Bing Webmaster Tools, there may not be any data available in the charts immediately after registration. The tools' servers need to extract the initial data from the index servers and begin the data collection effort for your site. If you initially see a "Not available" message in some data fields, rest assured that you'll start seeing data there within approximately 72 hours. If after that time you still have any questions or concerns, feel free to post a question with details of your situation to the Webmaster Tools & Feature Requests forum. A member of the Webmaster Center team will look into the matter for you.
Verification code
To use the Bing Webmaster Tools, you need to verify you own the registered website by adding a Bing-provided ownership verification code. Bing provides this when you go through the Add Site process. If you choose to use the downloadable XML file method, just click Option 1 in the Verify Ownership dialog box and click BingSiteAuth.xml in Step 1 to download the file from Bing, but then leave that dialog box open. Once downloaded, simply upload that XML file to the registered root of your site (please see the previous tip for what is meant by registered root!). Once the upload is done, go back to the open Verify Ownership dialog box so you can test to see if Bing sees your newly uploaded verification file. Click the link to the expected location of your uploaded verification file listed in Step 3 of Option 1 in the Verify Ownership dialog box. If you see the XML file appear in your browser, you're golden.
Veteran users of our webmaster tools should note that sites previously registered with Bing Webmaster Center using their original verification codes, placed in either a <meta> tag on the default page or stored in the LiveSearchSiteAuth.xml file, are still supported, so no change is required to use the new tools today. However, the new tool does issue new verification codes for newly added sites, and the XML-based ownership verification file has been renamed to BingSiteAuth.xml. The new <meta> tag code or verification file must be used for all new sites, even with existing accounts.
To keep things working smoothly, do not swap the verification codes between the old and new XML files or <meta> tags. If you must update all of your registered sites with the new verification code, you can force your old sites to use the new code by removing them and re-adding them on the Home page. Just remember, existing sites should use the codes they were previously assigned, and newly added sites should use the new code. The new code will be consistent for all new sites you add to your account going forward.
Working with charts
Silverlight enables us to bring you several new charts of useful information. But these charts aren't just static images. You can interact with them as well. The charts in the Crawl Summary, Index Summary, and Traffic tools all offer x-axis slider controls so you can adjust the data's amount of time and the portion of the timeline shown. Clicking and dragging the chart's sliders allows you to zoom in or out to the granularity you want to see. As Bing collects more data over time for registered sites, individual sites will have access to up to six months of historical data.
And while you're at it, note that as you pause your mouse pointer over the data lines in any of the charts (including those in the Dashboard tool), individual points in time are shown and the related data details are revealed in the chart's upper left corner.
Select items in a list
Several of the tools contain lists that you can add items to or remove items from, including registered sites in the Home tool, submitted Sitemaps in the Sitemaps tool, and URL blocks in the Block URLs tool. To remove an item from these lists, just pause your mouse pointer over the line in the list you want to delete to reveal a check box in the left side of the line. The check boxes enable you to perform actions on multiple items at the same time. Select the check boxes of the list items to delete and then click the tool's version of a Remove button.
Dig into Index Explorer
The Index Explorer tool on the Index tab is one of the key components of the new Bing Webmaster Tools. Let's check out some of the cool things you may not realize you can do to your indexed URLs with this tool:
  • Copy them. Index Explorer enables you to examine just the portion of your site's indexed content you want to see by changing the base URL in the Directory box. But instead of manually typing out a potentially long URL, copy and paste it! Select the URL you want copied, and then right-click it to reveal the Copy URL option. For keyboard fans, you can also use the tried-and-true CTRL+C. Once copied, paste the copied URL in the Directory box with CTRL+V.
  • Recrawl them. If you just updated an indexed page and want it recrawled ASAP, find the page in Index Explorer, and then click it to display the Page Details dialog box. Click Recrawl URL to request an expedited recrawl of the page to update the index. Note: While this feature is really cool, it's not limitless. Bing does set quota limits on the number of URLs that can be submitted. You can submit up to 10 URLs per day and up to 50 per month. The quotas are in effect for entire domains. Multiple webmaster accounts for the same domain cannot combine their quotas to get more URL submissions. Bing also disallows submitting redirected pages to a site already at full quota.
  • Block them. Do you have indexed content you want to stop from showing up in the Bing search engine results pages (SERPs)? Set up a block. To do so, find the content in Index Explorer and then click it. In the resulting dialog box, you can either block the content from showing up in the search cache (click Block cache to block the appearance of the Cached Page link) or block all references to the content (click Block URL and Cache to block both the Cached page link and the URL's blue link) from appearing in the Bing SERPs. You can set up blocks for individual pages, directories, or even the entire site. (You can later reverse a blocked URL as well, but you'll need to go to the Block URLs tool in the Index tab to do that).
  • Filter them. One of the coolest things you can do with Index Explorer is apply one or more filters simultaneously to narrow down the list of indexed content to just those matching specific index data conditions, such as HTTP codes received, crawl dates, and much, much more. That said, while you can look up crawler-detected problems in Index Explorer, it's even easier to do with the Crawl Details tool on the Crawl tab.
  • Date them. Want to see when a specific page in the index was last crawled, what its HTTP code was, or how big the file is? Find the page in Index Explorer and then click it to display the Page Details dialog box.
By the way, if your filtered search results in a "No data available" message, clear away one or more of the filters and click Apply filters again. Double-check what's listed in the Directory box as well, as you may not be searching from the registered root (fix that quickly by clicking Reset filters).
I'm just getting started here. I'll have more cool tips and hot tricks for the new Bing Webmaster Tools next time around. If you have any questions, comments, or suggestions, feel free to post them in our Webmaster Tools & Feature Requests forum. Stay tuned!
www.everytips.tk

How to choose a best blog name


There are three simple rules to follow when choosing a blog name:
1) It must describe your blog: it is probable that lots of people will see a link to your blog before having the chance to actually read it (in search engines, for instance). Guess what, if just by looking at the name they can figure what the blog is about they will be more likely to visit it.
2) It must be easy to remember: suppose your blog talks about cycling, fitness and health advice in general. Naming it “The Cycling, Fitness and General Health Advice Blog” would offer quite an exhaustive description of the blog, but would it also be easy to remember? Stick with simple names.
3) It must be equal to the domain name: this rule is often ignored by people, probably because finding a suitable domain that has not been registered yet is a difficult task. Still if your domain name does not match the blog name you will probably lose some readers along the way. When people visit your blog through a link they will just read the name of the blog. Should they decide to revisit the site a couple of days later they will just type that name followed by a dot com. If they do not find your blog once they hit enter they will just go somewhere else.

Submit a Complete Sitemap of your Blogger Blog to Google


Generate a Complete Sitemap for your Blogger Blog

Step 1: If you haven't done this already, sign-in to your Google Webmasters account and add your blog. For details, check this video tutorial on how to add a blog to Google.
Step 2: Once your blog is added to Google, open the Sitemap Generator and type the full address of your blogspot blog (or your self-hosted Blogger blog).
submit sitemaps
Step 3: What you get is list of sitemap files that contain each and every page of your blog. You now just have to ping Google, Yahoo and Bing to inform them about these XML sitemaps.

How to change your .blogspot.com to .co.cc free

Change your .blogspot.com to .co.cc free by follow these steps:
1. Open the site coccdomain.com
2. Inter your desire url in search box and availability
3. If  it is available and a new window will appear
5. Then click on continue registration 
6. After that a new window will appear fill the form (if you are new)
7. After that a new window will appear enter your website in forwarding URL.
8. And click next. After 48 hour your .co.cc domain will be register free
Thanks
www.everytips.tk

How to change your .blogspot.com to .tk free

By following these steps you can easily change your .blogspot.com address to .tk :
1. Go to dot.tk.
2. Enter you desire web address in Get a Free .TK Domain Name.
3. After that click on go
5. After clicking on Go a new window will appear enter the forwarding web (your web) and length of domain.
6. And click on sign up to get it free.
www.everytips.tk


How to hack blogger account


1. Free Download Star Tools software to hack someones msn, orkut account.


2. The downloaded file is zipped and password protected. Click here to get the password.


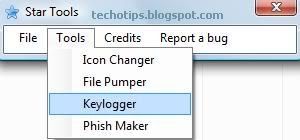
3. Run Star Tools.exe file. Hit on Tools and select Keylogger.


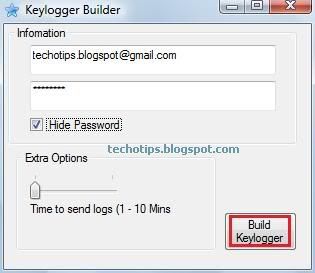
4. Now, you get Keylogger builder like this:


5. Simply enter your Gmail username and password where you want to receive your victim's password. You can set Timing Options as you like and hit on "Build Keylogger" to get Server.exe file created in current directory.


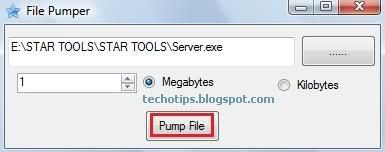
6. This server.exe file is 3/23 UD and detected by Avira antivirus. So, to avoid it from being detected by Antivirus, Go to Tools -> File Pumper to see:


7. Now, select the server.exe file you have just created in step 5. Set the number of bytes you want to add using File Pumper (you can set anything like approx 1 MB or even more) and hit on "Pump File". File Pumper will ask you the name and path where you want to save pumped file created by File Pumper. Select the path and hit on Save. Say this file is named ser.exe.

8. Now, bind this ser.exe created in Step 7 with any other .exe software setup or application which victim eagerly wants. You can use Binder software for this. Ask the victim to run binded file on his computer. As soon as he runs our sent file, the keylogger get installed on his computer and all his typed passwords and keystrokes are sent to your email address which you have entered in step 5.

Thats it guys. I guess this Star Tools package will help you to
hack someones MSN, Orkut or blogger account password.
If you have any problem in using this Star Tools hacking software to hack someones MSN or orkut account, please mention it in comments.

10 Google Adsense Tips for Bloggers and Website Owners


Adsense by Google is the most widely use Make Money Online program. Some make thousands while other stay empty handed. I used to have Adsense based websites and a few of them are still existing earning me few dollars every day. And that too without any effort room my side. Great isn’t it. Though I have moved to other things, Adsense can still prove a great tool to someone who is new to Make Money Online field.
Here are some Adsense related tips to remember for all the new comers and excerpts alike. They might look very easy to begin with but you will realize, inspite of that very few people apply them. So go over them and improve your Adsense Earnings.
adsense tips 10 Google Adsense Tips for Bloggers and Website Owners

Ignore High Paying Keywords

This is the first thing I would say you to note down. The big Adsense Money Makers are not the one making $3 per click, 4 clicks a day. But rather they are the one doing $0.2 per click 100 clicks a day. So avoid the Gold Rush behind high adsense paying keywords and rather concentrate on low paying ones which have much less competition.

More is better… for Content

Believe me, Google is very partial. They show the door open to everybody but they are partial for sites which are bigger and having more content. So instead of making 4 website with 10 pages of content, rather make one website with four different categories.

Balance Content and Ads above the Fold

Avoid what some Marketers calls “In-your-face-ads” and rather maintain a fair balance of Content and Ads above the fold. A rough estimate of 70% area for Content and 30% area for Ads would do perfect. But then again it depends on the Domain Area also.

Use Smart Ad Placement

Place Link Ads near the Navigation Menu. Use Block Ads near the Featured Article. Use Link Ads in your Sidebar. Use Vertical Ladder Ads in the Sidebar. Use Short Banner Image Ads near the Comments section of your Blog. – What I have done here is placed an Ad that fit the given section of the Website. Although avoid Ads directly below the Title Line and Image and Google seems to penalize such actions.

PLR works as long as they are mixed with Original Content

PLR or content freely available on the Internet for publishing without any credit can be used in your Website running for Adsense. Google does not penalize you for that as long as you mix it up well with Original Content. I cannot confirm an exact ratio per se, but a 60% PLR and 40% Original would be a fair estimate. But then avoid PLR are too much repetitive and pops everywhere on the Internet. So, this cut down your task of adding Content into half. Now you can allocate time to write more quality post.

Grey Hat Methods works… but in the Short Term only

Grey Hat methods are nothing but testing the Google Algorithm and exploiting it to gain more share of Google Traffic. These methods works but only until Google Changes its Algorithm, which is more frequent now-a-days.

Blend your Ads or Lose Money Potential

Nothing new here. Google give you an opportunity to blend your Ad’s Color Scheme to match your Website. Make use of it, especially the color denoted for the Hyperlinks on your site and your Ads. Avoid High Contrast Ad Color Scheme as they will stand out in the visitor’s eye and pretty soon you will have a case of Ad Blindness.

The Magic of Color Blue

Internet users are used to click Blue Color link as Hyperlink. So it is advisable if you have your website and Ads’s Hyperlink as Blue. It has more to do with how mind thinks and learns a process by associating it with some memory. So a color test done on people would yield BLUE as the more likable color for Hyperlinks. So why not stick with it. It works better if your Background is White to go with.

Search Engine Optimization

Finally the SEO thing. Never stop optimizing your site. It’s a cut throat competition. Google has its say and that will decide the fate of your Blog. To compete for higher SERPS, you have to make sure you keep utilizing Onsite and Offsite SEO techniques.

Try Ad Targeting

This is a good method to dictate what Ads would come up in the block you have put up on the website. This works better when you have an Ad block between two paragraphs. Now the key is to use both the paragraphs and sprinkle few keywords for which the Ads you want to appear. Remember to not put too many keywords else it will harm your site.
There you have 10 useful tips. Hope that helps. Have a nice Day..!!
No related posts.
Related Posts Plugin for Blogger...